Cloud adoption is a key strategy for almost every organization today. These organizations are either aiming for or already have some form of IT Transformation and Modernization. Everyone is looking to leverage the advantages like scalability, elasticity, cost reduction, on-demand self service, flexibility etc. The "Cloud" can offer wide range of services to businesses. Backup as a Service (BaaS) is a strategy for backup and recovery that involves consuming these services to be managed by a Cloud Service Provider.
If you are a Cloud provider of an OpenStack Cloud, you can offer Backup as a Service to your cloud tenants using DellEMC’s OpenStack Data Protection Extension.
If you are an OpenStack Cloud tenant or a consumer, you can ask for the Backup as a Service.
DellEMC’s OpenStack Data Protection Extension leverages Avamar and Data Domain. I am going to share my experience in a demo environment.
I will divide this in few parts as below
- Glimpse of Integration
- High level architecture
- Components of OpenStack DPE
- Cloud Provider Experience
- Add protection provider
- Register tenants / projects
- Create backup policies
- Cloud Tenant Experience
- Register VM instances
- Protect VM instances in a scheduled backup policy
- On-demand backup
- Monitor backup status
- List backups
- Restore the VM instance
- File Level Recovery (FLR)
So let’s start…
1) Glimpse of Integration
In my demo environment, I have created OpenStack Cloud using RDO Ocata release. More information about it can be found on https://www.rdoproject.org/install/packstack/.
I am using Avamar version 7.5.1 and Data Domain 6.0 as my protection storage.
All connections are using flat network and Cinder volume backend is LVM which uses local volumes.
I am not using CBT in my demo setup. However for production environments, CBT feature provides incremental backups and upto 8 concurrent backups can run via a single Proxy instance.
High level Architecture
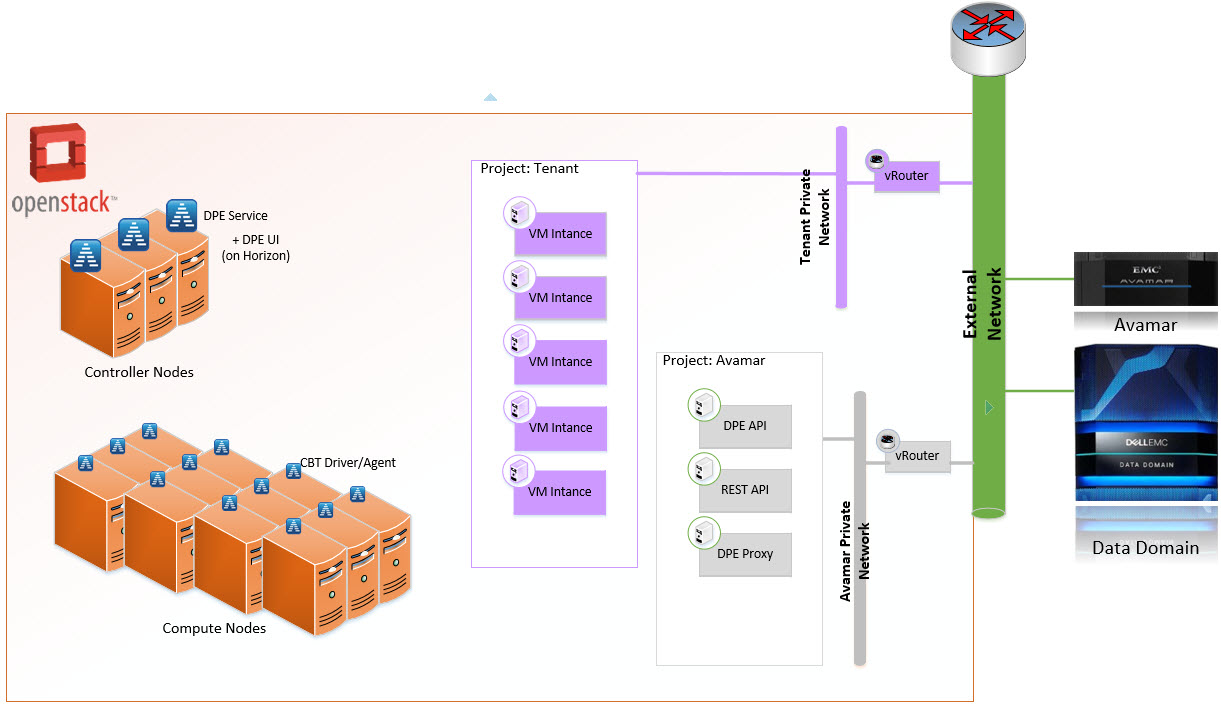
Here is a typical Architecture diagram of a multi node Openstack setup integrated with Avamar and Data Domain
Components of OpenStack DPE
These are the components providing Backup as a Service
Component
|
Description
|
Avamar Server
|
Backup Server - Also referred to as the Protection Provider
|
Data Domain
|
Provides scalable storage for backups, with features including source data deduplication
|
OpenStack DPE API
|
Management API for OpenStack DPE, provided as a qcow2 image.
Includes the following:
- API reference documentation via the Swagger UI.
- OpenStack DPE file-level restore (FLR) module, which provides FLR capability and a web interface
|
OpenStack DPE UI
|
OpenStack Horizon management plug-in for graphical management of OpenStack DPE
|
OpenStack DPE Proxy
|
An Avamar proxy or worker, provided as a qcow2 image and registered to the Avamar server
|
OpenStack DPE Service
|
Integrates with OpenStack controller nodes for Keystone authentication and logging. Provided as an RPM package for RHEL distributions and as a DEB package for Ubuntu
|
DBT Driver and Agent
|
Provides the ability to complete incremental backups of changed data since the last full backup
|
Once integrated, “DELLEMC Data Protection” dashboard will appear in the Horizon UI.

2) Cloud Provider Experience
Add protection provider
As a Cloud provider, you would add the Avamar as a protection provider. Which means all the backups will be performed using this provider

Register Tenants / Projects
You would also choose which Cloud Tenant should be able to perform the backup. You may choose to register only selected Tenants based on the service agreement


Create Backup Policies
You can create Backup Policies for the Tenant. This will include Backup Schedule, Datasets to backup and Retention policy. Tenant will choose the required backup policy for their backups. You can also specify the backup quota for the Tenant.


This would create corresponding group policy in the Avamar system

3) Cloud Tenant Experience
Register VM instances
As a Cloud Tenant’s Project Administrator, you can choose which VM instances are required to be protected and register them for Data Protection
Protect VM instances in a scheduled backup policy
You can add the VM instance in the Backup Group Policy (provided by Cloud Provider) for scheduled backups
On-demand backup
You can also choose to run an on-demand backup of the VM instance
Monitor backup status
Status of the backup can be monitored via same Dashboard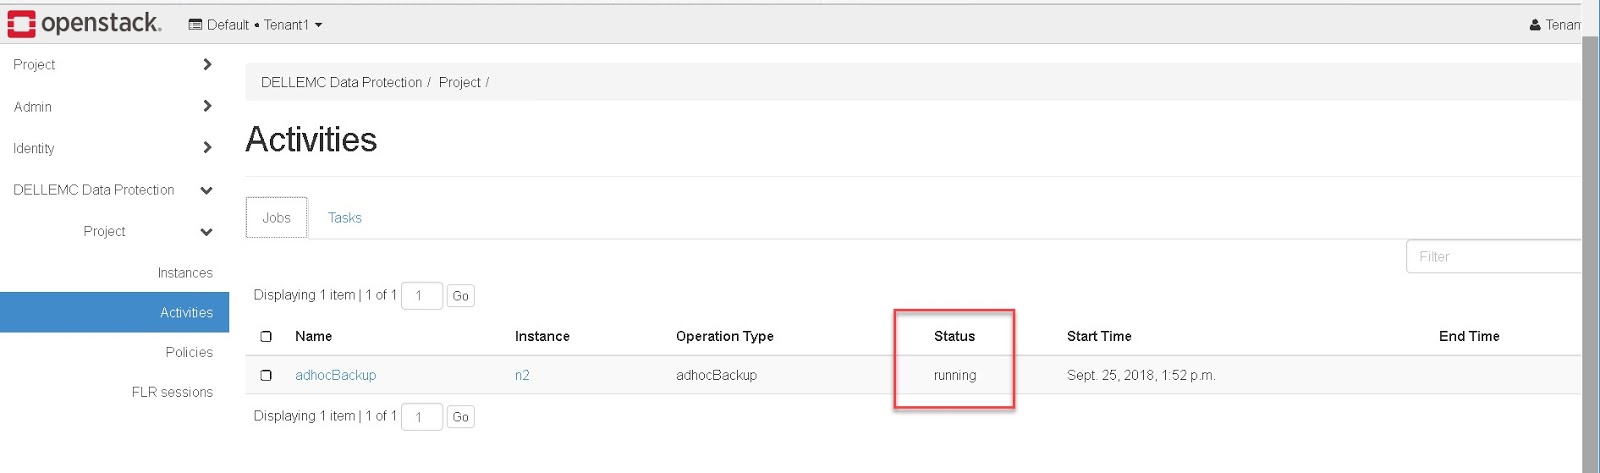
List backups
You can list all the backups of the VM instance
Restore the VM instance
You can choose to restore the entire VM from the backup. You can either overwrite the existing VM or restore it as a new VM instance


File Level Recovery (FLR)
Another beautiful feature of this OpenStack Data Protection Extension is File Level Recovery from the VM image backup performed.Here is how you perform FLR. As a Cloud Tenant’s Project Administrator, you can list the backups associated with a VM instance and create an FLR session


And Project Administrator can delete the FLR session

Hope this article helps you with OpenStack Data Protection.
Do share your feedback by commenting here or send it to bhavenjp@gmail.com. Good Day!
.