Showing posts with label Data Protection. Show all posts

Wednesday, July 13, 2022

PowerProtect Data Manager - Quick DR Recovery


PowerProtect quick DR recovery Demo:


Data Protection for Google Kubernetes Engine


Running cloud native apps on GKE and want to protect data, most importantly stateful apps? 

Look at Dell Technologies PowerProtect solution, a simple, efficient and cost-effective way to achieve this.


GKE Data Protection Demo using PowerProtect:


Saturday, October 13, 2018

Backup-as-a-Service for OpenStack Cloud

Cloud adoption is a key strategy for almost every organization today. These organizations are either aiming for or already have some form of IT Transformation and Modernization. Everyone is looking to leverage the advantages like scalability, elasticity, cost reduction, on-demand self service, flexibility etc. The "Cloud" can offer wide range of services to businesses. Backup as a Service (BaaS) is a strategy for backup and recovery that involves consuming these services to be managed by a Cloud Service Provider.

If you are a Cloud provider of an OpenStack Cloud, you can offer Backup as a Service to your cloud tenants using DellEMC’s OpenStack Data Protection Extension. 
If you are an OpenStack Cloud tenant or a consumer, you can ask for the Backup as a Service.

DellEMC’s OpenStack Data Protection Extension leverages Avamar and Data Domain. I am going to share my experience in a demo environment.
I will divide this in few parts as below
  1. Glimpse of Integration
    1. High level architecture
    2. Components of OpenStack DPE
  2. Cloud Provider Experience
    1. Add protection provider
    2. Register tenants / projects
    3. Create backup policies
  3. Cloud Tenant Experience
    1. Register VM instances
    2. Protect VM instances in a scheduled backup policy
    3. On-demand backup
    4. Monitor backup status
    5. List backups
    6. Restore the VM instance
    7. File Level Recovery (FLR)

So let’s start…

1) Glimpse of Integration

In my demo environment, I have created OpenStack Cloud using RDO Ocata release. More information about it can be found on https://www.rdoproject.org/install/packstack/.

I am using Avamar version 7.5.1 and Data Domain 6.0 as my protection storage.
All connections are using flat network and Cinder volume backend is LVM which uses local volumes.
I am not using CBT in my demo setup. However for production environments, CBT feature provides incremental backups and upto 8 concurrent backups can run via a single Proxy instance.

High level Architecture

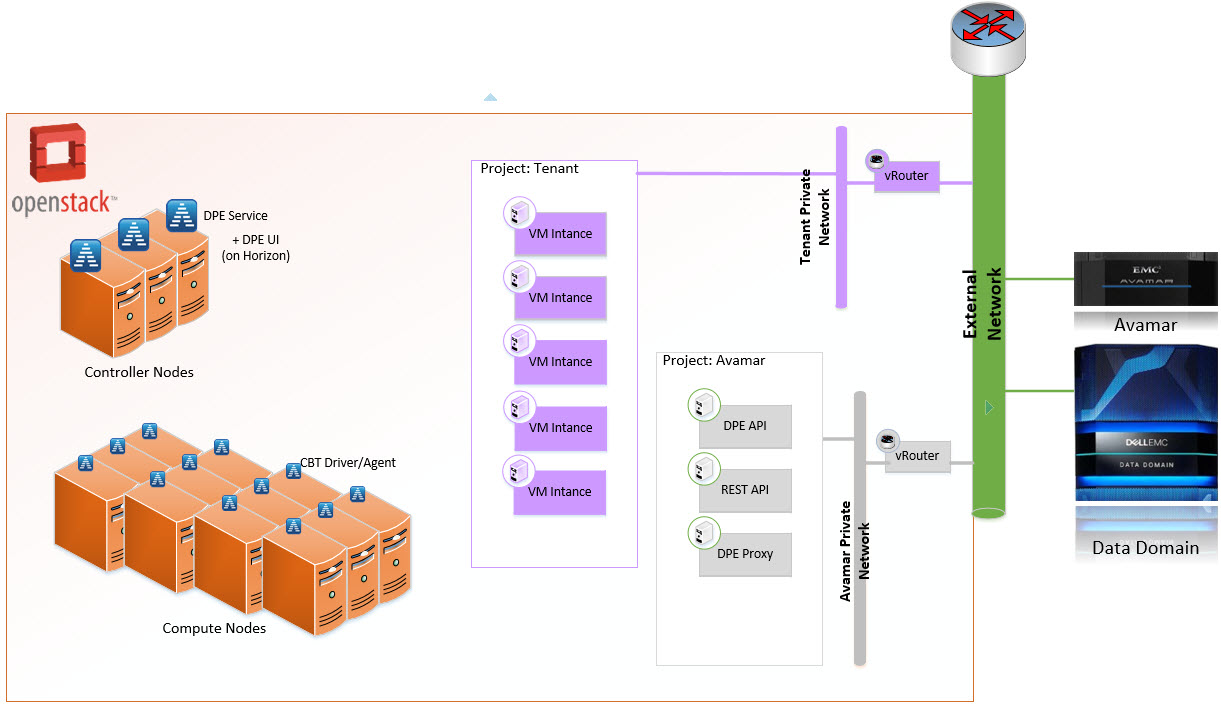
Here is a typical Architecture diagram of a multi node Openstack setup integrated with Avamar and Data Domain

Components of OpenStack DPE

These are the components providing Backup as a Service
Component
Description
Avamar Server
Backup Server - Also referred to as the Protection Provider
Data Domain
Provides scalable storage for backups, with features including source data deduplication
OpenStack DPE API
Management API for OpenStack DPE, provided as a qcow2 image.
Includes the following:
- API reference documentation via the Swagger UI.
- OpenStack DPE file-level restore (FLR) module, which provides FLR capability and a web interface
OpenStack DPE UI
OpenStack Horizon management plug-in for graphical management of OpenStack DPE
OpenStack DPE Proxy
An Avamar proxy or worker, provided as a qcow2 image and registered to the Avamar server
OpenStack DPE Service
Integrates with OpenStack controller nodes for Keystone authentication and logging. Provided as an RPM package for RHEL distributions and as a DEB package for Ubuntu
DBT Driver and Agent
Provides the ability to complete incremental backups of changed data since the last full backup

Once integrated, “DELLEMC Data Protection” dashboard will appear in the Horizon UI.

2) Cloud Provider Experience

Add protection provider

As a Cloud provider, you would add the Avamar as a protection provider. Which means all the backups will be performed using this provider

Register Tenants / Projects

You would also choose which Cloud Tenant should be able to perform the backup. You may choose to register only selected Tenants based on the service agreement

Create Backup Policies

You can create Backup Policies for the Tenant. This will include Backup Schedule, Datasets to backup and Retention policy. Tenant will choose the required backup policy for their backups. You can also specify the backup quota for the Tenant.
This would create corresponding group policy in the Avamar system

3) Cloud Tenant Experience

Register VM instances

As a Cloud Tenant’s Project Administrator, you can choose which VM instances are required to be protected and register them for Data Protection


Protect VM instances in a scheduled backup policy

You can add the VM instance in the Backup Group Policy (provided by Cloud Provider) for scheduled backups

On-demand backup

You can also choose to run an on-demand backup of the VM instance

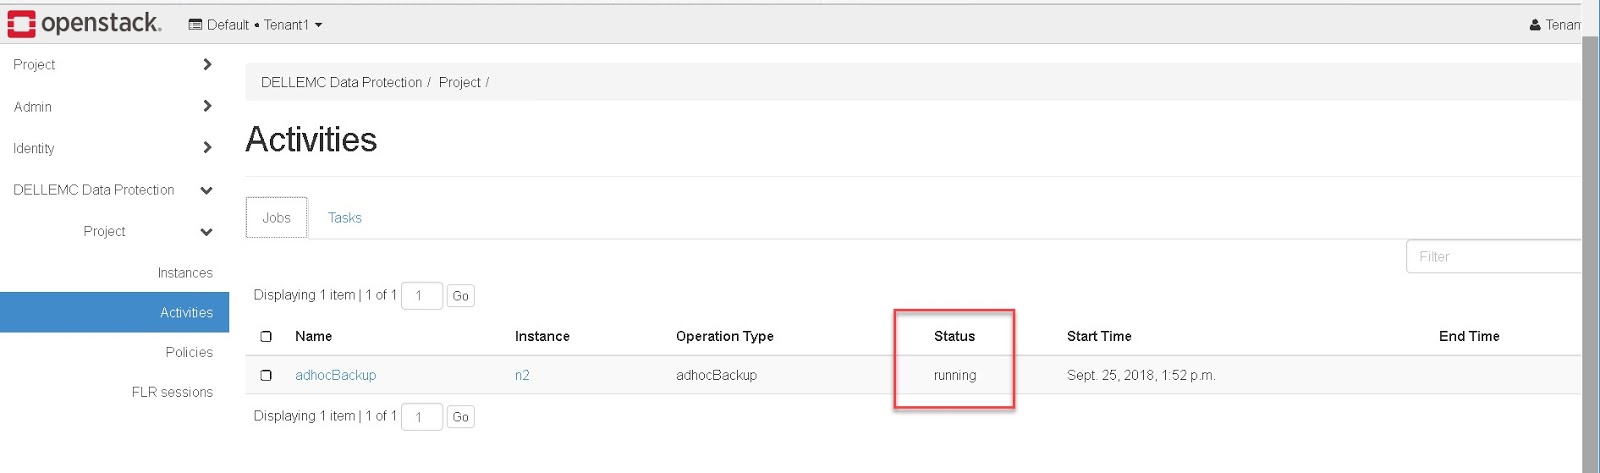
Monitor backup status

Status of the backup can be monitored via same Dashboard

This will create a clone of the Cinder volume, mount it on the DPE Proxy and transfer the backup data to Avamar + DataDomain

List backups

You can list all the backups of the VM instance

Restore the VM instance

You can choose to restore the entire VM from the backup. You can either overwrite the existing VM or restore it as a new VM instance
Check the restoration status
Once restored, it will be available under "Instances"

File Level Recovery (FLR)

Another beautiful feature of this OpenStack Data Protection Extension is File Level Recovery from the VM image backup performed.
Here is how you perform FLR. As a Cloud Tenant’s Project Administrator, you can list the backups associated with a VM instance and create an FLR session
Once the FLR ID and Token are created, it can be passed to end-user to browse their files via a web browser
Browse the backup, click on the name of the volume
Navigate to the path and click on the file to restore
Save the file that you want to restore
Once done, user can logout from the FLR UI
And Project Administrator can delete the FLR session

Hope this article helps you with OpenStack Data Protection.
Do share your feedback by commenting here or send it to bhavenjp@gmail.com. Good Day!

.

Sunday, March 19, 2017

Data Protection in Public Cloud (Networker Backups in AWS)


When a cloud strategy is developed, it is very important to include data protection. As more and more enterprise applications move to cloud, only the resilient cloud infrastructure is not enough as corruptions, accidental deletion etc. can still happen and backup must be included in the cloud strategy.
Most cloud providers provide native snapshot functionality however snapshots are not the same as backup. Snapshots are not application consistent and do not support granular recovery.

The Dell EMC Networker with CloudBoost solution provides optimized data protection for enterprise applications regardless of whether they are running on-premises or in public cloud. Here are the various use cases.


Here I am going to share more about “Backup in the Cloud”, where Enterprises have workloads running in the public cloud virtual machines (here AWS EC2) and would like to use public cloud object storage (here AWS S3) to store the backups.

Solution Components

Networker is a unified data protection software solution for the enterprises that centralizes, automates and accelerates backup and recovery across multi-platform environments, both physical and virtual.
CloudBoost is a data protection-optimized cloud enabler for use on-premises and in the cloud. It employs source-side encryption, compression, deduplication and WAN optimization for highly efficient backup in the cloud.
AWS S3 is a highly scalable, reliable, fast, inexpensive object storage provided by AWS.

While testing this, I have used public cloud infrastructure provided by Amazon Web Service (AWS). Our production servers/VMs are running as EC2 instances in a private subnet in AWS VPC and have Networker client installed. These being the Linux clients, the backup data will directly flow to object storage (AWS S3) and only meta-data will go to Networker Server and CloudBoost Appliance.

In this demo, Networker server and CloudBoost appliance are also installed in private subnet. Public subnet hosts a jump host for external users to connect and a NAT gateway.
All the production VMs (EC2 instances) required to be backed up, which are running in private as well as public subnet. With this, let us start configuration tasks and test backup and restore of EC2 instances to S3 Bucket.

High level Steps:
  1. Install and Configure Networker Server and clients on EC2 instances
  2. Deploy the CloudBoost appliance from EC2 AMI
  3. Register and Configure CloudBoost appliance in the EMC Cloud Portal
  4. Configure Networker to work with CloudBoost appliance
  5. Perform Test Backups
  6. Perform Test Restore


1.       Install and Configure Networker Server and clients on EC2 instances
It is assumed that Networker Server and Clients are already installed and configured as per standard procedures on EC2 instances. Make sure that EC2 instance has sufficient role assigned to write to S3.

2.       Deploy CloudBoost appliance from EC2 AMI
Use the CloudBoost AMI to launch an EC2 instance of size m4.xlarge in Private subnet of VPC. Also make sure that require ports are opened in the Security Group and this instance can connect to DellEMC Cloud Portal on port 443 and EC2 instance has sufficient role assigned to write to S3.

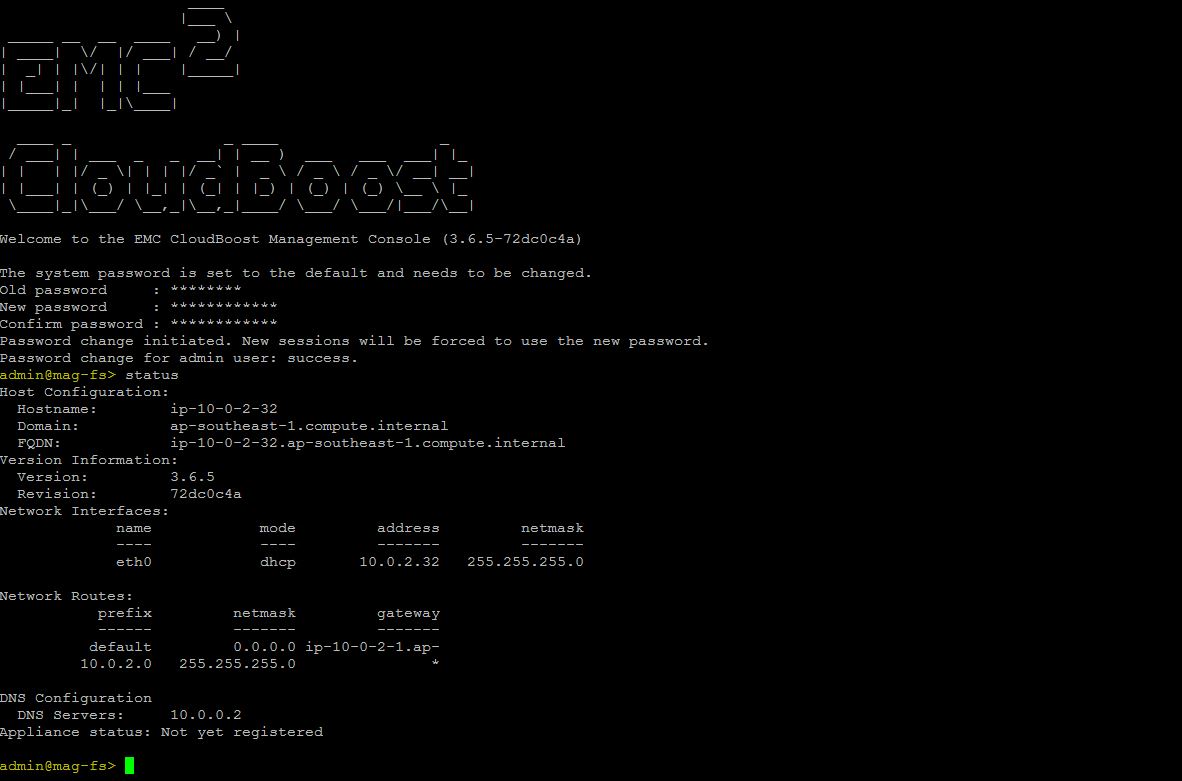
Once deployed, ssh to CloudBoost and verify the status
Change Hostname and other details if required

admin@mag-fs> fqdn cloudboostappliance.ap-southeast-1.compute.internal
 * Processing request
 * Changing hostname
 * Restarting DHCP
 * Restarting configuration controller
 * Restarting configuration agent
 * Restarting statistics collection service.
FQDN changed successfully
admin@mag-fs> status
Host Configuration:
  Hostname:        cloudboostappliance
  Domain:          ap-southeast-1.compute.internal
  FQDN:            cloudboostappliance.ap-southeast-1.compute.internal
Version Information:
  Version:         3.6.5
  Revision:        72dc0c4a
Network Interfaces:
             name            mode         address         netmask
             ----            ----         -------         -------
             eth0            dhcp       10.0.2.32   255.255.255.0

Network Routes:
           prefix         netmask         gateway
           ------         -------         -------
          default         0.0.0.0 ip-10-0-2-1.ap-
         10.0.2.0   255.255.255.0               *

DNS Configuration
  DNS Servers:     10.0.0.2
Appliance status: Not yet registered

admin@mag-fs>


3.       Register and Configure CloudBoost appliance in the EMC Cloud Portal
Login to DellEMC Cloud Portal and create a Cloud Profile pointing to the AWS account by entering proper Region, AWS Access Key ID and Secret. This shall create the required Bucket in the given AWS Region to store the backup data.


Register the CloudBoost appliance using the claim code generated via CLI

admin@mag-fs> register
Please use claim code XXXXXXX to register this device with the cloud controller.
Waiting for console to claim the code .............
Appliance successfully registered.
admin@mag-fs>

Enter the claim code in the Cloud Portal and verify the status

admin@mag-fs> status
Host Configuration:
  Hostname:        cloudboostappliance
  Domain:          ap-southeast-1.compute.internal
  FQDN:            cloudboostappliance.ap-southeast-1.compute.internal
Version Information:
  Version:         3.6.5
  Revision:        72dc0c4a
Network Interfaces:
             name            mode         address         netmask
             ----            ----         -------         -------
             eth0            dhcp       10.0.2.32   255.255.255.0

Network Routes:
           prefix         netmask         gateway
           ------         -------         -------
          default         0.0.0.0 ip-10-0-2-1.ap-
         10.0.2.0   255.255.255.0               *

DNS Configuration
  DNS Servers:     10.0.0.2
Appliance status: Registered, Not yet configured

admin@mag-fs>

Once registered, it will be visible on Cloud Portal

Configure the appliance by providing necessary information as shown below


Once completed, verify the status

admin@mag-fs> status
Host Configuration:
  Hostname:        cloudboostappliance
  Domain:          ap-southeast-1.compute.internal
  FQDN:            cloudboostappliance.ap-southeast-1.compute.internal
Version Information:
  Version:         3.6.5
  Revision:        72dc0c4a
Network Interfaces:
             name            mode         address         netmask
             ----            ----         -------         -------
             eth0            dhcp       10.0.2.32   255.255.255.0

Network Routes:
           prefix         netmask         gateway
           ------         -------         -------
          default         0.0.0.0 ip-10-0-2-1.ap-
         10.0.2.0   255.255.255.0               *

DNS Configuration
  DNS Servers:     10.0.0.2
Appliance status: Initial configuration completed


4.       Configure Networker to work with CloudBoost appliance
Set the remote mount password on the CloudBoost to be used for backup

admin@mag-fs> remote-mount-password enable YOURpassword
100% done. Status: Password changed successfully
Changing remote mount password: success
admin@mag-fs>

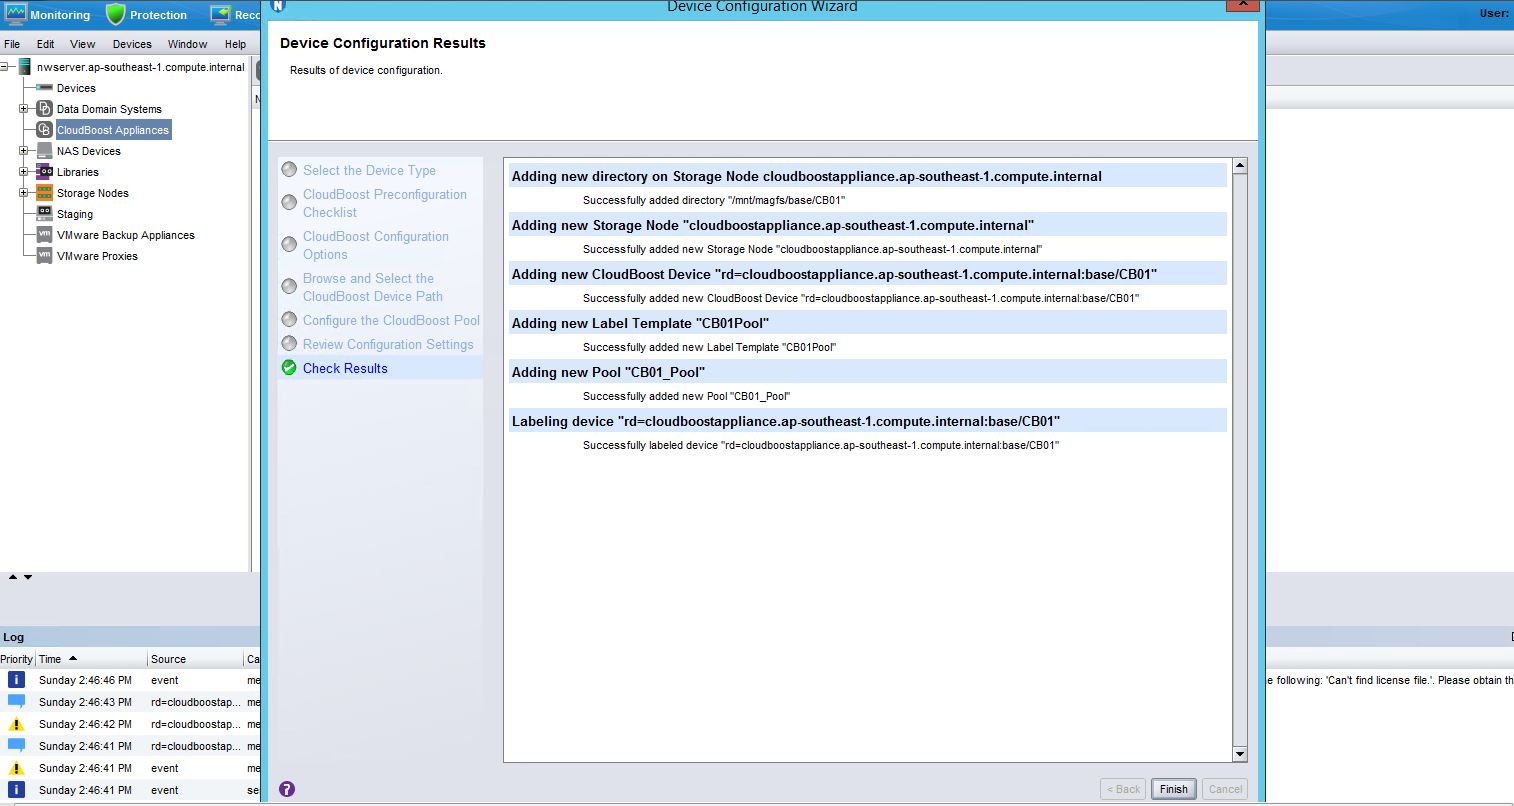
Use Device Configuration Wizard in Networker NMC to configure CloudBoost Device as below

You can verify that couples of S3 Buckets are created with their names starting with “mag”

5.       Perform Test Backups
Configure the Networker Policy and Workflow to backup to new Pool created above which uses CloudBoost Device

Start the Workflow to run the backup

Query the savesets and verify the Media Type


As these backups are using Source Deduplication, you can see the space savings and dedup ratio on Cloud Portal


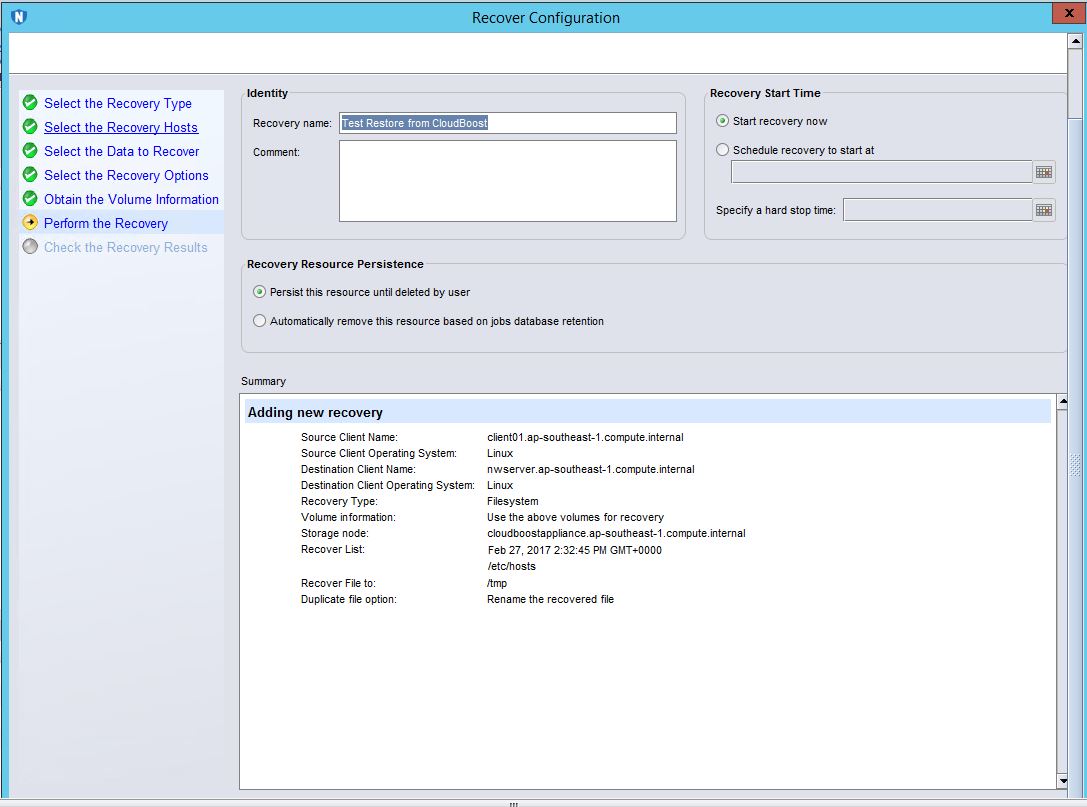
6.       Perform Test Restore
Let us perform a test restore from the backup just taken

Here is the successful restore


As we saw, NetWorker and CloudBoost solution enables data protection for enterprise applications running in the public cloud, on-premises in the data center or both.

Hope this is helpful!