
As the Enterprises embrace the Cloud Computing (be it public, private or hybrid), all of it's components (VM, Storage, Network etc) must be automated. And Backup or Data Protection is no exception. As someone said.... Automate or Perish.
The NetWorker REST API is an interface that provides programmatic access to the NetWorker data protection service. By using this REST API, one can build applications to automate NetWorker operations. This helps Networker to be integrated with most Cloud Management Platforms to provide"Backup as a Service".
Starting from version 9.0.1, Networker released support for REST API and in version 9.1 it is upgraded to version two (v2) - with backward compatibility support for v1.
Here I have tested some basic operations like
- Configure a new client
- Perform backup of a client
- Configure a new VM client for VMWare level backup
- Perform image level backup of a VM
- Perform image level restoration of a VM
So let's get the hands dirty!
Installation:
As the NetWorker REST API service is deployed in the same Apache tomcat container as the NetWorker authentication service, no separate installation is required.
In my setup, the Networker Server hostname is "NWServer" so the REST API is exposed at URL https://NWServer:9090/nwrestapi/.
1. Configure a new client
1-1. List the Networker clients
- #curl -X GET -H "Content-Type: application/json" -H "Authorization: Basic XXXXXXXX" -H
- "X-PrettyPrint:1" "https://NWServer:9090/nwrestapi/v2/global/clients" -k -1
- {
- "clients": [
- {
- "aliases": [
- "Client01",
- "Client01.vlab.local"
- ],
- "applicationInformation": [],
- "blockBasedBackup": false,
- "checkpointEnabled": false,
- "clientId": "25f4943c-00000004-58aeae7b-58c8ee86-00025000-ff74b956",
- "hostname": "Client01.vlab.local",
- "indexBackupContent": false,
- "links": [
- {
- "href": "https://NWServer:9090/nwrestapi/v2/global/clients/47.0.232.4.
- 0.0.0.0.137.10.173.88.192.168.1.241",
- "rel": "item"
- }
- ],
- "nasDevice": false,
- "ndmp": false,
- "ndmpMultiStreamsEnabled": false,
- "ndmpVendorInformation": [],
- "parallelSaveStreamsPerSaveSet": false,
- "parallelism": 4,
- "protectionGroups": [],
- "remoteAccessUsers": [],
- "resourceId": {
- "id": "47.0.232.4.0.0.0.0.137.10.173.88.192.168.1.241",
- "sequence": 1
- },
- "saveSets": [
- "All"
- ],
- "scheduledBackup": true,
- "tags": []
- },
- {
- "aliases": [
- "NWServer",
- "nwserver.vlab.local"
- ],
- "applicationInformation": [],
- "blockBasedBackup": false,
- "checkpointEnabled": false,
- "clientId": "b0556c84-00000004-58ad08e3-58ad08e2-00015000-ff74b956",
- "hostname": "nwserver.vlab.local",
- "indexBackupContent": false,
- "links": [
- {
- "href": "https://NWServer:9090/nwrestapi/v2/global/clients/82.0.114.31
- .0.0.0.0.160.8.173.88.192.168.1.241",
- "rel": "item"
- }
- ],
- "nasDevice": false,
- "ndmp": false,
- "ndmpMultiStreamsEnabled": false,
- "ndmpVendorInformation": [],
- "parallelSaveStreamsPerSaveSet": false,
- "parallelism": 12,
- "protectionGroups": [],
- "remoteAccessUsers": [],
- "resourceId": {
- "id": "82.0.114.31.0.0.0.0.160.8.173.88.192.168.1.241",
- "sequence": 3
- },
- "saveSets": [
- "All"
- ],
- "scheduledBackup": true,
- "tags": []
- }
- ],
- "count": 2
- }
 The same thing can be queried using any REST API client
1-2. Create a new client
Let us create a client name "01-SCM.vlab.local" and configure it to backup "/tmp/" saveset
POST /nwrestapi/v2/global/clients

List clients using REST API, however just filter the two fields (hostname and savesets) to be displayed
- #curl -X GET -H "Content-Type: application/json" -H "Authorization: Basic XXXXXXXX" -H
- "X-PrettyPrint:1" "https://NWServer:9090/nwrestapi/v2/global/clients?fl=hostname,savesets"
- -k -1
- {
- "clients": [
- {
- "hostname": "01-SCM.vlab.local",
- "saveSets": [
- "/tmp"
- ]
- },
- {
- "hostname": "Client01.vlab.local",
- "saveSets": [
- "All"
- ]
- },
- {
- "hostname": "nwserver.vlab.local",
- "saveSets": [
- "All"
- ]
- }
- ],
- "count": 3
- }
1-3. Add the Client to an existing Protection Group
It is possible to create protection group, policy, workflow, action etc via REST API. However these are one time effort in most cases. Here it is assumed that Networker protection policies are setup and the newly created client needs to be added in the group to schedule the regular backups.
Let us make a PUT call to the protection group "Bronze-Filesystem" and add the "resourceId" of the client as a "workItem". The resourceId can be obtained from above mentioned GET API for a client.
PUT /nwrestapi/v2/global/protectiongroups/Bronze-Filesystem


2. Perform Backup of a Client
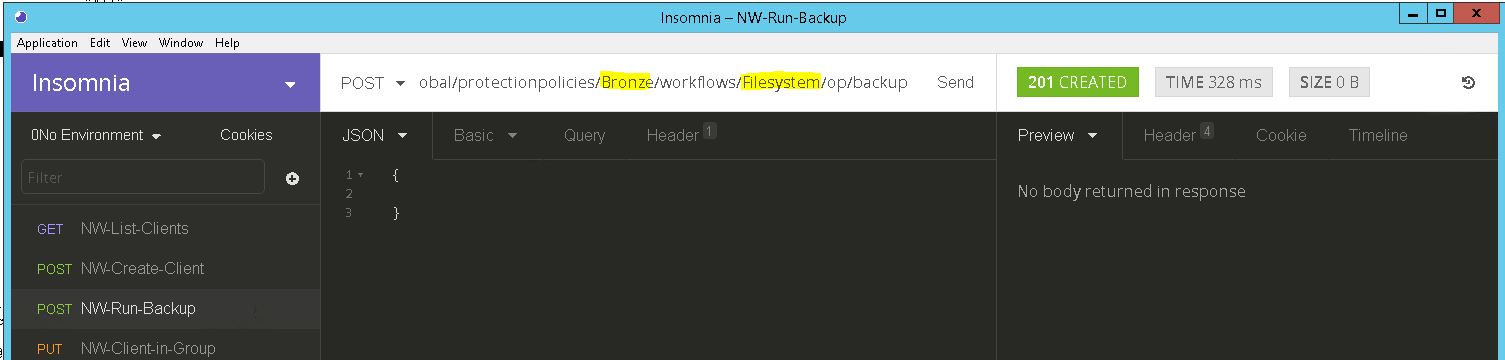
2-1. Perform On-demand Backup
Now let us run an on-demand backup for workflow "Filesystem" in Policy "Bronze".
POST /nwrestapi/v2/global/protectionpolicies/Bronze/workflows/Filesystem/op/backup

2-2. List the Backups
We can generate a list of all the backups performed for the client. This output shows that there are two backups found for this client.
- # curl -X GET -H "Content-Type: application/json" -H "Authorization: Basic XXXXXXXX" -H
- "X-PrettyPrint:1" "https://NWServer:9090/nwrestapi/v2/global/clients/45.0.92.4.0.0.0.0.
- 213.71.54.89.192.168.1.101/backups?fl=name,saveTime,retentionTime,instances" -k -1
- {
- "backups": [
- {
- "instances": [
- {
- "clone": false,
- "id": "1496737359",
- "status": "Browsable",
- "volumeIds": [
- "2353985"
- ]
- }
- ],
- "name": "/tmp",
- "retentionTime": "2017-07-06T23:59:58+08:00",
- "saveTime": "2017-06-06T16:22:38+08:00"
- },
- {
- "instances": [
- {
- "clone": false,
- "id": "1496736942",
- "status": "Browsable",
- "volumeIds": [
- "2353985"
- ]
- }
- ],
- "name": "/tmp",
- "retentionTime": "2017-07-06T23:55:26+08:00",
- "saveTime": "2017-06-06T16:11:09+08:00"
- }
- ],
- "count": 2
- }
3. Configure a new VM client for VMWare level Backup
For most VMWare based cloud platforms, this is a mandatory step and can be provided as self service. Users can select their own VMs and add them to backup.
First let us get the UUID of the VM that needs to be protected
- # curl -X GET -H "Content-Type: application/json" -H "Authorization: Basic XXXXXXXX" -H "X-PrettyPrint:1" "https://NWServer:9090/nwrestapi/v2/global/vmware/vcenters/vc01.vlab.local/vms?fl=hostname,uuid" -k -1
- {
- "count": 2,
- "vms": [
- {
- "hostname": "vproxy_1",
- "links": [
- {
- "href": "https://NWServer:9090/nwrestapi/v2/global/vmware/vcenters/vc01.vlab.local/vms/50390eb3-02e9-19d7-3aa8-f5652bb40dbe",
- "rel": "item"
- }
- ],
- "uuid": "50390eb3-02e9-19d7-3aa8-f5652bb40dbe"
- },
- {
- "hostname": "prodserver",
- "links": [
- {
- "href": "https://NWServer:9090/nwrestapi/v2/global/vmware/vcenters/vc01.vlab.local/vms/5039d1fc-00a0-0758-cfe8-16438fb2ea7c",
- "rel": "item"
- }
- ],
- "uuid": "5039d1fc-00a0-0758-cfe8-16438fb2ea7c"
- },
- ]
- }
Here our VM "Prodserver" needs to be backedup and it's UUID is "1fc-00a0-0758-cfe8-16438fb2ea7c".
Let's add it to the VMWare protection group "Gold-Vmware"
POST /nwrestapi/v2/global/protectiongroups/Gold-Vmware/op/updatevmwareworkitems


The VM will be included in the backup from next schedule.
4. Perform image level Backup of a VM
With this, Cloud Management Platform can provide the on-demand backup feature for users.
POST /nwrestapi/v2/global/vmware/vcenters/vc01.vlab.local/vms/5039d1fc-00a0-0758-cfe8-16438fb2ea7c/op/backup


5. Perform image level Restoration of a VM
Here is how to restore a VM to revert to it's old state as of last successful backup.
Get the required the IDs of the backup to restore
- # curl -X GET -H "Content-Type: application/json" -H "Authorization: Basic XXXXXXXX" -H
- "X-PrettyPrint:1" "https://NWServer:9090/nwrestapi/v2/global/vmware/vcenters/vc01.vlab.
- local/protectedvms/5039d1fc-00a0-0758-cfe8-16438fb2ea7c/backups/80524b93-00000006-
- fe36ac21-5936ac21-00045000-7a80b956/instances" -k -1
- {
- "backupInstances": [
- {
- "clone": false,
- "id": "1496755233",
- "links": [
- {
- "href": "https://NWServer:9090/nwrestapi/v2/global/vmware/vcenters/
- vc01.vlab.local/protectedvms/5039d1fc-00a0-0758-cfe8-16438fb2ea7c/backups/80524b93-
- 00000006-fe36ac21-5936ac21-00045000-7a80b956/instances/1496755233",
- "rel": "item"
- }
- ],
- "status": "Recoverable",
- "volumeIds": [
- "2353985"
- ]
- },
- {
- "clone": true,
- "id": "1496755806",
- "links": [
- {
- "href": "https://NWServer:9090/nwrestapi/v2/global/vmware/vcenters/
- vc01.vlab.local/protectedvms/5039d1fc-00a0-0758-cfe8-16438fb2ea7c/backups/80524b93-
- 00000006-fe36ac21-5936ac21-00045000-7a80b956/instances/1496755806",
- "rel": "item"
- }
- ],
- "status": "Recoverable",
- "volumeIds": [
- "4263771792"
- ]
- }
- ],
- "count": 2
- }
then trigger the restoration
POST /nwrestapi/v2/global/vmware/vcenters/vc01.vlab.local/protectedvms/5039d1fc-00a0-0758-cfe8-16438fb2ea7c/backups/80524b93-00000006-fe36ac21-5936ac21-00045000-7a80b956/instances/1496755233/op/recover


Hope this was useful and hope to see more and more Data Protection and Automation for Cloud.
.
Informative blog.. Do you have any for adding DB Clients using REST API ? like for DB2 or Oracle ?
ReplyDeleteHi Raj,
DeleteYou should be able to do that however lockbox part could be tricky. Haven't tried it yet. Will share if I manage to get a DB system in my lab.
Hello Bhaven this is indeed useful and nice . Do you have any other update on your test that you did using Rest API which could save time and it will be useful if you could share it . Best Regards - Karthik
ReplyDeleteHello Bhaven,
ReplyDeleteThis was really informative, just had a query, when i try to extend the retention of a Backup of a particular client, by using PUT , it gives an error as :
{
"message": "HTTP 405 Method Not Allowed",
"status": {
"code": 405,
"codeClass": "Client Error",
"reasonPhrase": "Method Not Allowed"
Hi Rampy,
DeleteI do not think there is a method to update the backup retention.
Hi Bhaven, I am using rest api client POSTMAN.
ReplyDeletehttps://NWServerIP:9090/nwrestapi/v3 #networker version 9.2
Headers: content-type and Accept with value application/json
Authorization: Basic Auth with username and password used to login NWserver
Receiving 404 Error
Nice Post and informative data. Thank you so much for sharing this good post, it was so nice to read and useful to improve my knowledge as updated one, keep blogging.
ReplyDeleteOpen Stack Training in Electronic City
very nice post...informative blog
ReplyDeletePostman configuration – note to self, always make sure you turn off SSL verification in PostMan when you are using self-signed certifi....Read More
Its really nice post and informative too . I am going to use these for sure thank you for sharing it . I am stuck in one report i was wondering if can help me . I have to report for last day backup status for all VM ( Snapshot backups) which shows VM name , status , start date , end date , and scanned size . If you can help me i will be really thank full to you
ReplyDeletevCloud Tech Provides secure IT services & Solutions and is considered by many organizations to be the best IT Software Reseller..
ReplyDeleteHi, do you know how can I get the information of the column Status ? Succeeded/Failed ?
ReplyDelete